
 Hallihallo – heute in die ganze Welt! Was für ein toller Morgen! Ein neuer BlogHop – ein neues Designteam, das sich aus je einer Stampin´Up! Demonstartorin aller Stampin´Up! -Märkte weltweit zusammensetzt. Ich freu mich ja so, dabei zu sein!
Unser Ziel: Eine Box/Verpackung auf verschiedenste Art interpretiert, mit der dazugehörigen Anleitung, damit du dich sofort an deinen Wertisch setzen kanns. Das passende Material hast du hoffentlich, ansonsten kannst du es direkt bei uns beziehen :-D
What a great Morning! This is a brand new BlogHop Idea and I´m proud of being part of this gorgeous team! One demonstrator of each Stampin´Up! Market all over the world takes part and will show you her version of a box, which we choosed to create to inspire YOU! AND – each lady gives you the tutorial for her box. So you can just start and create – if you need something to work – just call us :-D It´s long ago that I´ve to write in English – so be gracious with me :-D
HEUTE zeigen wir dir …… (*Trommerlwirbel*) ………. Today it´s a ….. (*drum roll* ) ….

Schokoladenspender! Ich liebe die Bakery Cookies von De Beukelaer, aber die Verpackung ist ja nun wirlich nicht zu gebrauchen – daher fiel meine Wahl auf diesen Inhalt …
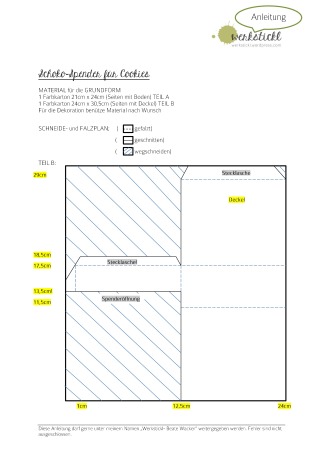
I love Bakery Cookies by De Beukelaer, but not its box – so this was my choice to put in my Chocolate Dispenser. Um diesen Spender zu bauen benötigst du 2 Farbkartonteile – einmal 21cm x 24cm (d.h., dir reicht ein A4-Format) und das zweite ist 24cm x 30,5cm groß (hierfür benötigst du einen der großen Bögen 12″x12″) .
Ich habe den schönen Craftkarton aus dem Herbst-Winterkatalog verwendet und dafür 2 der großen Bögen verwendet.
To create this dispenser, I´ve just used 2 sheets of our 12″x12″ CRAFT Cardstock from the holidaycatalogue. Hier siehst du die beiden Teile bereits geschnitten und gefalzt – meine schönen Pfeile sollen dich aufmerksam machen auf die „Verlängerung“ der Schnittlinie, die NICHT gefalzt werden soll – ich hatte ja keine so hübsche Anleitung :-D
Die gepunkteten Laschen sind Klebelaschen.
Here you can see both cardstock cut and fold – take care of my beautiful Arrows :-D -they show you my folds, which schouldn´t be there :-D .
The pointed flaps will be glued.
 Wenn also die Seiten zusammengeklebt wurden, dann kommt der Boden dran.
If you´ve glued the sides together you´ll have to do the bottom. Die Bodenlasche von TEIL B wird zwischen die beiden von TEIL A, geklebt, wobei die VERDECKLASCHE (hier siehst du sie bereits mit Kleber versehen) – abschließend über die andern zwei nach innen geklebt wird. …
Therefor you have to glue TEIL B between the both bottomparts of TEIL A – and the VERDECKLASCHE (it´s the flap with glue) should come up and hide the smaller part (OMG, I hope you can understand what I mean!) as you can see on the picture below. …. fertig :-D ….. You´ve managed it! …..
 … und bereit zum dekorieren. …..and ready for decorating!
 Vielleicht mit etwas Designerpapier – das gibts ja momentan in einer tollen 3+1 Aktion. Ich habe hier die Herbstimpressionen verwendet – die neutralen Rückseiten sind einfach wunderschön….
Perhaps you like to work with designerpaper – think at the cool promotion! I´ve used the wonderful DSP Painted Autumn. ..… oder so? Mit dem Tiefprägefolder „Blätterrelief“ und dem wunderschönen glänzenden Band in Farngrün brauchts nicht mehr viel ….
…. or use an embossingfolder to create a beautiful box which doesn´t need much more than a little branch, ribbon and a sentiment.
SOOOOOOOO …… SOOOOOOOOO……
Wenn du jetzt kreativ gleich loslegen möchtest, dann darsft du dir gerne die Anleitung als PDF herunterladen. Ich freue mich immer, wenn ich deine Ideen zu sehen bekomme und bitte dich, mich gegebenfalls auch zu verlinken.
Falls du Material von Stampin´Up! benötigst, dann darfst du dich auch gerne melden – ich bestelle dir jederzeit – wenn du Porto sparen möchtest, dann schließ dich doch meiner Sammelbestellung nächsten Freitag an!
If you like to start right now, feel free to use my tutorial (Download the PDF) and I would love to see your boxes! If you post it – please link me (is this the right phrase?). :-D
Wenn du jetzt neugierig geworden bist, dann schau doch in der Runde weiter
…. Zurück kommst du zu Sharlene nach Neuseeland ….

…. und in dieser Richtung gehts ins schöne Frankreich zu Aude


Beate I love your project – it’s so cool! And I love the sweets that the box dispenses. . . so much fun. Thanks for sharing
O Shannean – thank you! Do you know these cookies? They´re really delicious!
Was für eine clevere Idee? Erst dachte ich.. hm.. ne Box.. ok, aber jetzt sehe ich, daß Du einen sehr cleveren Cookie Spender gebaut hast. Chapeau!
Ich freue mich sehr, daß Du ein Teil von unserem Team bist.
LG Tanja
Hihi, dachte nicht, dass ich euch noch überraschen kann :-D Umso schöner. GLG retour!
Gorgeous dispensers Beate! So clever, and those chocolates look good too!
Yes, they´re delicious! :-D Thank you so much Sharlene!
Cooler Bloghop – geniale Idee! Verpackungen kann man ja immer brauchen – und dann sind auch noch die Anleitungen dabei… einfach sensationell!
Deine Interpretation finde ich toll und werde sie bald ausprobieren! Danke dafür! 😘😘😘
Ja, die Idee ist total genial und ich freu mich sehr, wenn ich dann deine Verarbeitung sehe :-D
GLG
I thought exactly the same as Tanja did, so your box is a box with a suprprise! I am very honoured that you chose Dutch cookies to make this box for! ;o) Both of your boxes are beautiful and ar decorated very elegant. I think they make perfect gifts!
Hihi, I love that I could surprise you :_D ! Poffetjes, Vlan and many other delicious things – I love the dutch cooking style :-D
Oh wow I love your version Beate. Nice to see a different design and your decoration is beautiful. Looking forward to meeting you at a Euro event soon. Zoe x
Thank you Zoe! Oh yes, I love to see all of you at an Event! I´m so honored to be in this BH with you and all these wonderful women!
Beate x
This is just wonderful, Beate!! I love the design of your box!! So cute!
Dena, WOW – I feel honored that YOU love my design :-D It´s great to be with you in a Designteam! Greetings from Austria!
Beate